
To tie a fishing knot on a hook, thread the line through the hook’s eye and then wrap it several times around itself before pulling the end through the loop created. Secure the knot by pulling tightly to ensure the hook is fastened.

Mastering the skill of tying a fishing knot is essential for anglers of all levels. Quick and reliable knot-tying can mean the difference between a great catch and a lost opportunity. Whether you’re a seasoned pro or a beginner, knowing how to secure your hook to the line effectively is crucial. It’s not just about making any knot; the strength and durability of the knot can significantly impact your fishing success. A properly tied fishing knot ensures that your hook remains attached to the line under the tensions of casting, retrieving, and battling fish. This guide simplifies the process, providing clear steps to confidently prepare your fishing hook for the next big catch.
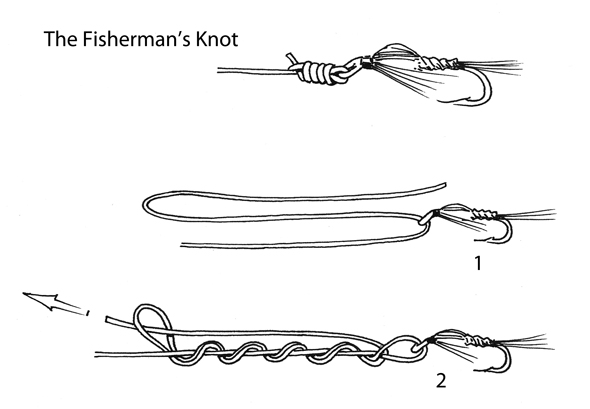
Here Picture of how we tie a fishing knot on a hook for fishing.
Mastering the skill of tying a reliable knot on a hook for fishing is key to a successful fishing experience. With the right knot, you can ensure your lure or hook stays secure. This prevents losing that trophy catch due to a slip of the line. Let’s delve into the basics of fishing knots and why they’re critical.
Choosing The Right Fishing Line
Choosing the right fishing line is crucial to successful fishing, as it directly affects your chances of catching and landing a fish. There are different types of fishing lines available, each with its characteristics. Here are some things to consider when choosing the right fishing line
Importance Of A Secure knot on a hook for fishing.
A secure knot on a fishing hook is crucial for ensuring the success of a fishing expedition and the safety of the catch. The importance lies in the fact that a well-tied knot enhances the overall strength and durability of the fishing setup, reducing the risk of losing a prized catch due to a knot failure. Additionally, a secure knot ensures the proper presentation of bait or lures, increasing the chances of attracting and hooking fish. Ultimately, the attention to tying a reliable knot contributes significantly to the effectiveness and enjoyment of the fishing experience while minimizing the likelihood of disappointment or equipment failure.
| Aspect | Reason for Importance |
|---|---|
| Line Strength | Preserve the line’s integrity, reducing breakage chances. |
| Hook Security | Ensures the hook remains attached during the fight with fish. |
| Confidence in Casting | Allows for bold, accurate casts without fear of losing tackle. |
A robust knot acts as the critical link between the angler and the fish. Perfecting your knot-tying technique is a cornerstone of successful fishing.
Types Of Fishing Knots For Hooks
Hooking a fish starts with tying the perfect knot. Knowing various knots is key to a successful fishing trip. Each knot has its strengths. Some are easy and strong. Others are good for certain types of lines. Let’s explore three popular fishing knots for hooks.
Improved Clinch Knot
The Improved Clinch Knot is famous among anglers. It works well with monofilament and fluorocarbon lines. Here’s how to tie it:
- Pass the line through the eye of the hook.
- Wrap the tag end around the standing line 5-7 times.
- Bring the tag end through the small loop near the hook eye.
- Now pass the tag end through the larger loop just created.
- Wet the knot, pull tight, and trim the excess.
This knot holds firmly, especially in smaller diameter lines.
Palomar Knot
The Palomar Knot is strong and easy. It is a favorite for braided lines. Follow these steps:
- Double the line to make a loop and pass it through the hook’s eye.
- Tie a simple overhand knot with the loop.
- Pass the loop over the hook’s end.
- Wet the knot, pull tight on both the loop and the standing line.
This technique offers a reliable hold for various fishing scenarios.
Turle Knot
The Turle Knot is unique. It is best for thin wire hooks with small eyes. It’s popular with fly fishermen. Tie it with these steps:
- Thread the line through the hook eye and form a simple loop.
- Lay the tag end over the loop, wrapping it around the standing line twice.
- Bring the tag end back through the loop, from where it started.
- Wet the knot. Hold the hook and pull the standing line to tighten.
With practice, the Turle Knot is quick and effective for securing flies.
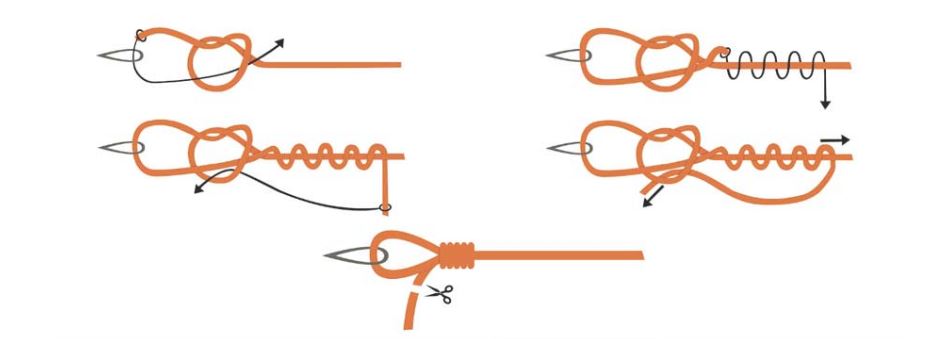
Step-by-step Guide To Tying The Improved Clinch Knot
Rigging a successful setup involves the crucial skill of tying a secure fishing knot. The Improved Clinch Knot stands out as a reliable favorite among anglers worldwide. This trusty knot offers strength and simplicity, making it an excellent choice for securing hooks, lures, or swivels to your fishing line. Let’s break down this classic knot into an easy-to-follow guide, sure to get beginners and seasoned fishers alike ready for their next casting adventure.
Threading The Line
Begin by threading about 6 inches of your fishing line through the eye of the hook. Make sure to leave enough line for the proceeding steps. Keep the line steady to prevent it from slipping out.
Forming The Loop
- Pinch the standing line and the tag end between your thumb and forefinger.
- Wrap the tag end around the standing line five to seven times for optimal strength.
- Bring the tag end back towards the eye of the hook, creating a loop just above the hook eye.
- Pull the tag end through this loop, establishing the initial stage of the knot.
Finalizing The Knot
- Spot the small loop formed above the eye when creating the first loop.
- Thread the tag end of the line through this small loop.
- Moisten the knot with saliva or water to reduce friction.
- While holding the tag end, pull the standing line to tighten the knot.
- Slide the knot down to the eye of the hook smoothly without twisting the line.
- Trim the excess tag end closely to complete the knot.
The Improved Clinch Knot is now secure and ready to face the test of the waters!
Credit: anglers-secrets.com
Mastering The Palomar Knot Technique
The Palomar knot is a must-know for every fishing enthusiast. This knot is strong, reliable, and easy to tie, making it ideal for securing hooks to your fishing line. Join us as we walk through the steps of tying the Palomar knot with precision. Not only is this knot effective for various types of fishing, but its simplicity also means you can get your line into the water faster.
Folding The Line
Start by taking your fishing line and double it to create a loop. Make sure the loop is long enough to fit over the hook or lure. This loop is the foundation of the Palomar knot, essential for the next step. Care should be taken not to twist the line, as this could weaken the final knot.
Creating The Overhand Knot
With your loop ready, tie a simple overhand knot. Here’s how:
- Pass the loop through the eye of the hook.
- Make an overhand knot by bringing the loop end over and under the standing line.
- Be careful not to twist the lines and leave enough space on the loop to pass it through the hook.
Securing The Hook
To finish, slide the loop above the overhand knot you just created over the hook. Ensure the loop goes completely over the hook and sits snug against the overhand knot. Here’s what to do:
- Hold the standing line and the end with one hand.
- With the other hand, pull the hook to tighten the knot.
- Trim any excess line from the end leaving a short tag.
Check the knot is secure by gently pulling the line. The Palomar knot is now complete, ensuring your hook stays firmly in place for that big catch!
Troubleshooting Common Fishing Knot Issues
Mastering the art of tying a fishing knot is essential for a successful fishing trip. Even with the right technique, anglers often encounter issues. This section breaks down common fishing knots problems and how to solve them.
Dealing With Slippage
Slippage is a common enemy when securing a hook. It’s frustrating and can cause the loss of a great catch. To tackle slippage:
- Ensure the line is moist before tightening the knot to reduce friction.
- Pull each part of the knot carefully to avoid loosening.
- Use a knot that suits the line type, like the Palomar knot for braided lines.
Adjusting For Line Strength
Different lines have varied strengths and characteristics. Follow these tips:
- Select a knot that compliments the line’s durability like the Improved Clinch knot for monofilament.
- Avoid over-tightening, which can weaken the line.
- Test the knot by gently pulling on the line to ensure it holds firm.
Practicing Consistency
Consistency is key in executing flawless knots.
- Practice tying the same knot multiple times to build muscle memory.
- Use consistent tension throughout the knot-tying process.
- Check your knots regularly and retie if necessary to ensure reliability.
Credit: www.flyfisherman.com
Angler’s Tips For Perfecting Knots
Tying the perfect fishing knot is essential for a successful angling adventure. A secure knot connects the lure or hook to the fishing line. A weak knot can result in losing a fish or even the whole tackle. For every angler, knowing the right knot can make all the difference. Below are key tips and methods to ensure every knot holds strong under the pull of a lively fish.
Practicing With Different Lines
Fishing lines vary in thickness and material. Each type requires different handling. Mastery only comes with consistent practice. Here’s how to become proficient:
- Start with thicker lines – They are easier to handle and see.
- Move to thinner lines as skill improves.
- Use both mono and braided lines for versatility.
- Repeat knots multiple times for muscle memory.
Using Tools For Tying Knots
Various tools can simplify knot-tying, especially for beginners or those with less dexterity:
| Tool | Benefit |
|---|---|
| Knot tying tools | Provides leverage and precision |
| Needle-nose pliers | Helps pull knots tight |
| Line cutters | Trims excess line easily |
https://www.youtube.com/watch?v=1YkNzVFKLnk
Credit: www.flyfisherman.com
Frequently Asked Questions Of How We Tie A Fishing Knot On A Hook For Fishing.
Tying a fishing knot on a hook is an essential skill for anglers. Here are some frequently asked questions and answers on this topic:
Q1: What is the best knot for tying a hook?
A: The Palomar knot is widely considered one of the best and easiest knots for tying a hook. It’s strong, reliable, and works well with various types of fishing lines.
Q2: How do I tie a Palomar knot?
Double about 6 inches of the line and pass it through the eye of the hook.
Tie a simple overhand knot, forming a loop around the hook.
Pull the loop over the hook, ensuring it is large enough to pass over the hook’s eye.
Moisten the knot and pull both ends of the line to tighten it securely.
Q3: What other knots are suitable for tying hooks?
A: Besides the Palomar knot, popular knots for tying hooks include the Improved Clinch Knot and the Uni Knot. These knots are relatively easy to learn and provide good strength.
Q4: How do I tie an Improved Clinch Knot?
Thread the line through the eye of the hook and make 5-7 wraps around the standing line.
Pass the tag end through the loop near the eye of the hook.
Thread the tag end through the larger loop created, moisten, and tighten the knot.
Q5: When should I use a loop knot for tying a hook?
A: Loop knots, like the Non-Slip Loop Knot or the Perfection Loop, are great for allowing more movement of the bait or lure. They are often used when a free-swinging action is desired.
Q6: How do I tie a Non-Slip Loop Knot?
Double the line and pass it through the eye of the hook.
Make a simple overhand knot with the doubled line.
Pass the loop over the hook and tighten it by pulling both ends of the line.
Q7: Should I wet the knot before tightening it?
A: Yes, wetting the knot before tightening helps reduce friction and heat, making it less likely to weaken the line during the tightening process.
Q8: How do I choose the right knot for different fishing situations?
A: Consider factors such as the type of line, the size of the hook, and the fishing conditions. Generally, strong and easy-to-tie knots like the Palomar and Improved Clinch Knot work well in various situations.
Remember, practice is key to mastering these knots. Take the time to practice tying them at home before heading out to fish.
Can Fishing Knots Hold Heavy Fish?
Yes, properly tied fishing knots like the Trilene Knot and the Uni Knot are capable of holding heavy fish. It’s key to remember the importance of technique and consistency when tying your knot to ensure maximum strength.
How To Securely Tie A Hook For Saltwater Fishing?
Remember that knot strength is very important in saltwater fishing where large and powerful fish are. Here’s a step-by-step guide on how to safely tie a hook for saltwater fishing using a common fishing knot called the advanced clinch knot:*Advanced Clinch Knot:**Materials Required:**
– Fishing hook
– Fishing nets
**Steps:**
1. **Thread the line:**
– Pass the end of the fishing line through the eye of the hook. Allow about 6 inches to work with the tag end.
2. **end tag:**
– Hold the hook with one hand and wrap the tag end of the line around the standing line (main body of the line) at least five to seven times with the other hand.
3. **Thread through the loop:**
– After wrapping, pass the end of the tag through the small loop created just above the eye of the hook.
4. **Moisturize and harden:**
– Before pulling the knot tight, wet it with saliva or water. This reduces friction and ensures a tight knot.
– Hold the hook and standing line with one hand and the tag end with the other, then pull together to tighten the knot.
5. **Inspect Knots:**
– After tying the knot, inspect it to make sure there are no loops or tangles. Give it a gentle tug to check for any slippage.
Suggestion:
– **Practice tying knots:** Practice tying knots at home before fishing. Familiarization will make the process smoother in the water.
– **CHECK KNOT STRENGTH:** Check your knot periodically, especially if you’ve caught a few fish or the line is under stress. Re-tie if necessary.
– **Choose the right knot:** There are different knots for different situations. The advanced clinch knot is a general-purpose knot, but you may want to explore other knots based on your specific needs.
Always follow the manufacturer’s recommendations for the type and strength of the line you are using
Conclusion
Mastering the art of tying a fishing knot secures your chances of a great catch. We’ve demystified the process, ensuring your hook is set for success. Practice these steps, and the perfect knot will become second nature. Get out there and enjoy the satisfaction of a well-prepared fishing adventure—with every knot tied confidently.
