
To switch a baitcaster reel from left to right, first, unscrew the handle nut and transfer the handle to the opposite side. Secure the components back in place, ensuring the reel operates smoothly.
Anglers often prefer a specific hand orientation for their baitcaster reels. Depending on individual comfort and dexterity, you may feel the need to change your reel handle from one side to the other. This flexibility allows for a customized fishing experience, catering to both right- and left-handed users.
Whether you’ve just purchased a new baitcaster or you’re adjusting an old favorite, the process of switching the reel handle is straightforward and requires minimal tools. This quick adjustment can greatly impact your fishing efficiency and comfort on the water, making it a simple yet important task for any angler to master. Let’s check How to switch the Baitcaster reel from Left to Right.

Introduction To Baitcaster Reels
An Introduction to Baitcaster Reels can open up a new world of fishing possibilities for both novice and experienced anglers alike. These versatile reels offer superior control and precision, which can significantly enhance your fishing technique and efficiency. From the satisfying click of the spool to the ergonomic feel as you cast into the waters, baitcaster reels are the go-to choice for anglers targeting larger fish or searching for that extra edge in their fishing outings.
Understanding Baitcaster Reel Mechanics
The mechanics of a baitcaster reel are what set it apart from other types of fishing reels. Unlike the spinning reel, a baitcaster sits on top of the rod and has a revolving spool that aligns with the fishing rod. It allows for a more direct line feed, which is why mastering its functionality is critical to casting with precision and avoiding the dreaded backlash. The key components include the spool tension knob, the brake system, the drag system, and the handle, all designed to work in harmony for a seamless fishing experience.
Importance Of Reel Orientation In Fishing

Proper reel orientation is fundamental to casting with accuracy and retrieving effectively. Whether you are left or right-handed, the orientation can impact your ability to react quickly and maintain control of your line during the entirety of your fishing activity. Thus, aligning your reel’s orientation with your dominant hand maximizes comfort and improves your overall angling performance.
Overview Of The Switching Process From Left To Right-Handled Use
The process of switching the orientation of a baitcaster reel from left to right-handed use involves several detailed steps that, while simple, require careful attention to ensure the reel’s integrity. Typically, it involves disassembling the handle side of the reel, switching the handle to the opposite side, and reassembling the components securely. This process is crucial for tailoring the reel to fit an angler’s specific needs and preferences.
Preparation For Reel Switching
Forging the right path in your angling adventures often involves tailoring your equipment to suit your dominant hand. If you’ve found yourself with a baitcaster reel that doesn’t align with your casting preference, fear not. Switching a baitcaster reel from left to right, or vice versa, is a simple process that can make a significant difference in your fishing efficiency and comfort.
The switch involves a few straightforward steps requiring minimal tools but utmost attention to detail to protect your valuable gear. Let’s get you prepared for this transition by outlining the necessary provisions for a successful reel switch.
Tools Needed For The Reel Switch
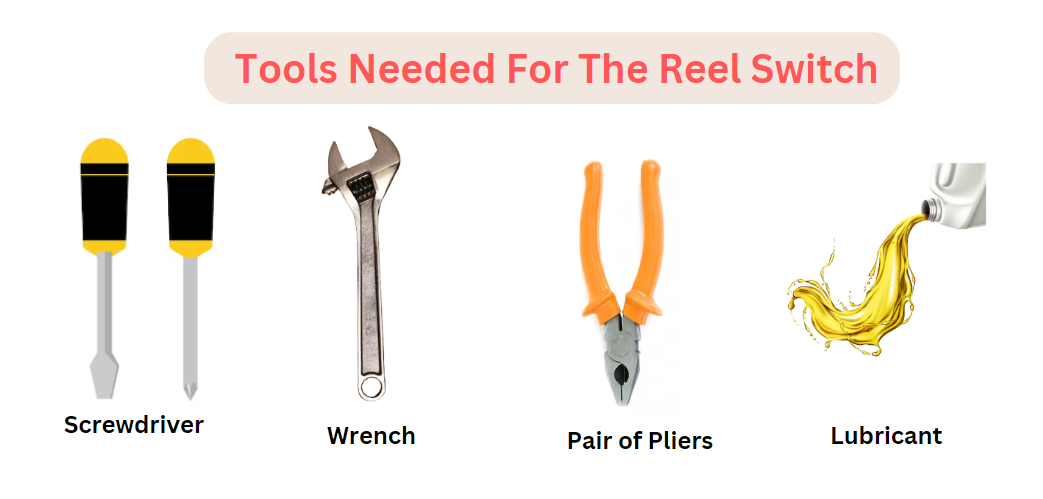
Before delving into the actual switch, gather all necessary tools. This will streamline the process and ensure you’re not mid-switch searching for something crucial. Here is a list of tools you will typically need:
- Screwdriver – Depending on your reel model, a flathead or Phillips head may be required.
- Wrench – To assist with any nuts that may need tightening or loosening.
- Pair of Pliers – For any small parts that require a gentle grip.
- Clean Cloth – To keep your hands and reel free from oil and debris.
- Lubricant – Specifically designed for fishing reels to ensure smooth operation post-switch.
Safety Considerations And Protecting Your Gear
The safety of both the angler and the longevity of the fishing gear is paramount. Before beginning, make sure your workspace is clean and well-lit. A cluttered area can lead to misplaced parts or accidents.
Additionally, work on a flat, stable surface to avoid drops that could damage the reel. Handle your tools and reel with care. Ensure your hands are dry to maintain a firm grip on the reel and tools. It’s recommended to handle small components with pliers to prevent slipping and potential injuries.
Identifying Reel Components Involved In The Switch
Familiarize yourself with the components of your baitcaster reel that will be involved in the process:
- Handle: It’s the part you’ll be moving from one side to the other.
- Star Drag: Adjusts the drag setting and may need to be temporarily removed.
- Cover Plate: This shields the internal mechanics and will be unscrewed during the switch.
- Spool Tension Knob: This knob controls the spool’s resistance and might require adjustments.
- Brake System Cap: If present, it could be swapped in accordance with the handle.
Once you’ve localized these elements and have the right tools at hand, you’re ready to start the reel transition to cater to your dominant hand, leading to more comfortable and effective fishing trips.
Step-by-step Guide To Switching The Baitcaster Reel
Embarking on the Step-by-Step Guide to Switching the Baitcaster Reel can be an empowering experience for any angler wishing to customize their fishing setup. Whether for comfort, efficiency, or simply personal preference, switching the handle side of your baitcaster reel need not be a daunting task. Let’s break down the process into simple steps that will swiftly guide you through the transition from left to right-hand operation and get you back to casting and reeling in with confidence.
Removing The Handle And Accessing The Gear Mechanism
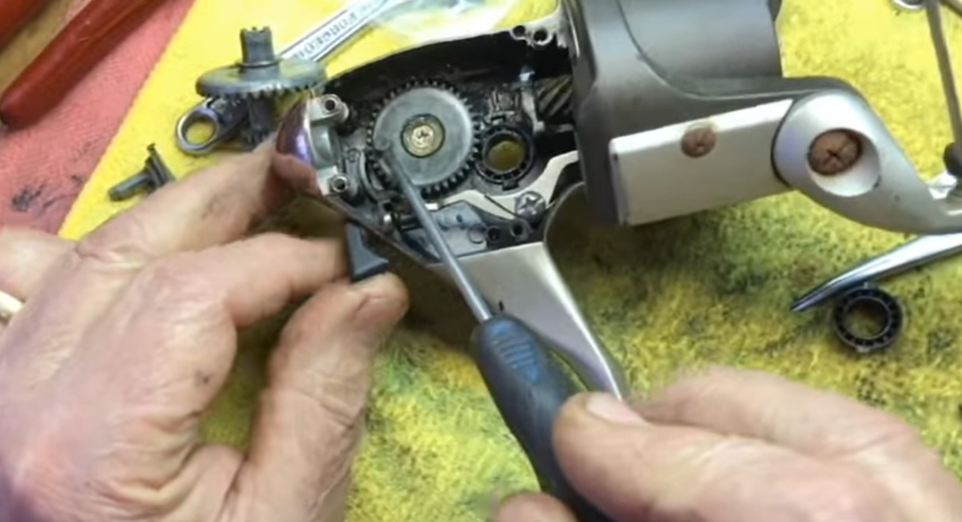
Commencing with the fundamental step of removal, it’s imperative to disassemble your reel with care:
- Ensure your baitcaster is detached from the rod and free of any line tension.
- Locate the handle’s securing cap or screw—typically situated on the opposite side of the handle.
- Use an appropriate screwdriver or hex key to gently loosen and remove the cap.
- Once the cap is off, you can pull the handle away from the reel body, revealing the gear mechanism beneath.
Repositioning The Gear And Handle For Right-hand Operation
Transitioning to a right-hand retrieve involves a tactic repositioning of the reel’s components:
- Inspect the gear mechanism to identify the drive shaft that the handle attaches to.
- Remove any washers or bushings on the shaft and keep them in order for reassembly.
- Locate the corresponding attachment point on the right-hand side of the reel’s gearbox.
- Align the handle with the new attachment point, taking note of the original orientation.
- Re-apply any washers or bushings in their original order onto the drive shaft before attaching the handle.
Ensuring Proper Alignment And Reassembly Of Parts
With the handle placed on the desired side, meticulous alignment and reassembly are vital for optimal reel performance:
- Double-check the placement of all bushings and washers for accurate alignment on the drive shaft.
- Reattach the handle securely, ensuring it moves freely without undue resistance or play.
- Carefully screw back the handle cap without over-tightening, to prevent damage to the reel’s body or threads.
- Perform a functional test by twirling the handle multiple times to ensure that the gear mechanism operates smoothly.
- If all components are in place and moving as expected, your baitcaster is set for right-hand operation.
By merging patience with precision, anglers can effortlessly switch their baitcaster reel from left to right-hand operation. Armed with this knowledge, the freedom to customize is in your hands, ensuring that nothing stands between you and your next great catch.
Testing And Fine-tuning After The Switch
After successfully switching your baitcaster reel from left to right-hand operation, the journey to personalized comfort and efficiency is only just beginning. Testing and fine-tuning after the switch play an essential role in achieving optimal performance. Knowing that all reeling components are correctly configured, properly adjusted, and in sync with your casting style will ensure your future fishing expeditions are both fruitful and enjoyable.
Verifying The Correctness Of The Reconfiguration
Begin by attentively examining the reel. Make certain the handle is securely fastened and the reel sits comfortably when mounted on the rod. Perform a few practice reels to confirm the operation feels smooth. If any irregularities are felt, carefully disassemble and recheck each step taken during the switching process.
Addressing Tension And Drag Adjustments
- Spool Tension: Adjust the spool tension knob so that when the lure is released, it descends gradually and does not cause the spool to overspin, preventing backlash.
- Brake System: Fine-tune the baitcaster’s brake system for optimal control. This helps tailor the reel’s performance to different lure weights and wind conditions.
- Drag System: Set the drag to a reasonable value for the targeted species. A well-adjusted drag system allows the line to pay out under the correct tension, ultimately leading to fewer broken lines or lost fish.
Casting Techniques Post Switch: What Might Change?
Once you’re confident in the reel’s mechanical setup, focus on the casting. Right-handers switching to reel with their left hand may notice a difference in casting precision and comfort. Pay attention to the following:
- Hand-Eye Coordination: It may take some time to retrain your coordination. Be patient, and practice frequently.
- Reel Control: You might need to refine your thumb pressure on the spool for better casting control to prevent the dreaded “bird’s nest.”
- Repetitive Casting: Continuously cast to establish muscle memory. With each cast, adjust your technique as needed to increase accuracy and distance.
Maintenance And Care For Your Reconfigured Baitcaster

Maintenance and care for your reconfigured Baitcaster are crucial to ensuring optimal performance and longevity. Whether you’ve recently switched your baitcaster reel from left to right or are simply looking to maintain its pristine condition, understanding routine maintenance and how to tackle common issues post-switch is key. Proper care mitigates potential problems, and appropriate storage secures the reel’s functionality for future fishing adventures. Grab your tackle box and let’s reel in some maintenance wisdom.
Routine Maintenance Tips For A Baitcaster Reel
Maintaining your baitcaster on a regular basis not only helps keep it in peak condition but also prevents future issues that can arise from neglect. Here are some essential routine maintenance tips:
- Clean Your Reel after every use, especially if fishing in saltwater, to prevent corrosion and the buildup of grime.
- Oil the Bearings every 2-3 outings with a high-quality reel oil to ensure smooth operation.
- Check for Wear and Tear on the line and replace it if it shows signs of damage or memory.
- Inspect All Moving Parts regularly for any potential damage and ensure they are functioning correctly.
Troubleshooting Common Issues After Switching
Transitioning your baitcaster reel from left to right-hand operation may lead to a few common issues. Stay ahead with these troubleshooting tips:
| Issue | Solution |
|---|---|
| Cast Control Adjustments | Readjust the cast control settings to accommodate the change in winding direction. |
| Handle Looseness | Ensure all screws and fittings are tight after reassembly. |
| Reversed Drag Settings | Confirm that the drag is set according to your preference and handling. |
Long-term Storage Advice For Right-handed Configurations
The correct storage of your right-handed baitcaster reel is vital for preserving its condition. Follow this long-term storage advice:
- Relieve Tension: Before storing, back off the drag to reduce pressure on the internal components.
- Clean and Dry: Thoroughly clean and dry the reel to prevent rust and corrosion.
- Loosen the Handle: Slightly loosen the handle to avoid stressing the gears.
- Protective Case: Store your reel in a protective case away from extreme temperatures and humidity.
When it comes to optimizing your fishing experience, understanding how to switch your baitcaster reel from left to right can make a significant difference. Whether you’re a seasoned angler or a beginner, the process is straightforward with the right guidance.
Unboxing: How to Switch Baitcaster Reel from Left to Right
Begin by unboxing your baitcaster reel and familiarizing yourself with its components. Take note of the reel handle and its existing orientation, setting the stage for the conversion.
Prep Workspace: How to Switch Baitcaster Reel from Left to Right
Create a comfortable workspace to ensure a smooth transition. Gather essential tools, including a screwdriver and any specialized equipment for your particular reel model.
Click Plate: How to Switch Baitcaster Reel from Left to Right
Access the click plate, a crucial component governing the reel handle’s placement. Carefully follow the manufacturer’s instructions to release and reposition it for right-handed operation.
Hawg Tech Handle Installation: How to Switch Baitcaster Reel from Left to Right
Enhance your baitcaster with the Hawg Tech handle for ergonomic advantages. Install it securely according to the provided guidelines, customizing your reel to suit your preferences.
Reinstalling the Drag Star: How to Switch Baitcaster Reel from Left to Right
Ensure a seamless transition by reattaching the drag star securely. This step is pivotal for maintaining the reel’s functionality and drag system efficiency.
Aligning the Screw: How to Switch Baitcaster Reel from Left to Right
Precision is key when aligning the screw that secures the handle. Take your time to guarantee a tight fit, preventing any potential wobbling during operation.
Aligning Reel Handle: How to Switch Baitcaster Reel from Left to Right
Align the reel handle with precision, confirming that it sits securely in the designated position. This step is crucial for a flawless switch between left and right-handed configurations.
Frequently Asked Questions On How To Switch Baitcaster Reel From Left To Right
How Do You Change A Reel From Left To Right?
To switch a reel from left to right-hand retrieve, open the reel cover. Flip the bearing found inside. Reassemble the reel. Adjust the handle to the right side. Test the reel to ensure correct operation.
Are Baitcast Reels Left Or Right-handed?
Baitcast reels come in both left and right-handed models, catering to angler preferences. Users can choose the orientation that suits their dominant hand for comfortable casting and reeling.
What Is The Difference Between Right And Left Retrieve?
Right and left retrieve refer to the side of a fishing reel where you wind the handle. Right, retrieve suits right-handed anglers, as they cast with the left hand and wind with the right. Left retrieve is the opposite, favoring left-handed individuals.
How Do You Change A Fly Reel From Left To Right?
To change a fly reel from left to right-hand retrieve, remove the spool, flip the bearing or clutch, and reassemble. Consult your reel’s manual for model-specific instructions.
Conclusion
Switching your baitcaster reel’s orientation is straightforward with the right steps. Mastering this skill enhances your angling versatility and comfort. Whether you’re left or right-handed, the ability to adapt is at your fingertips. Now, grab your reel, get out there, and enjoy a tailored fishing experience every time.
Happy casting!
