

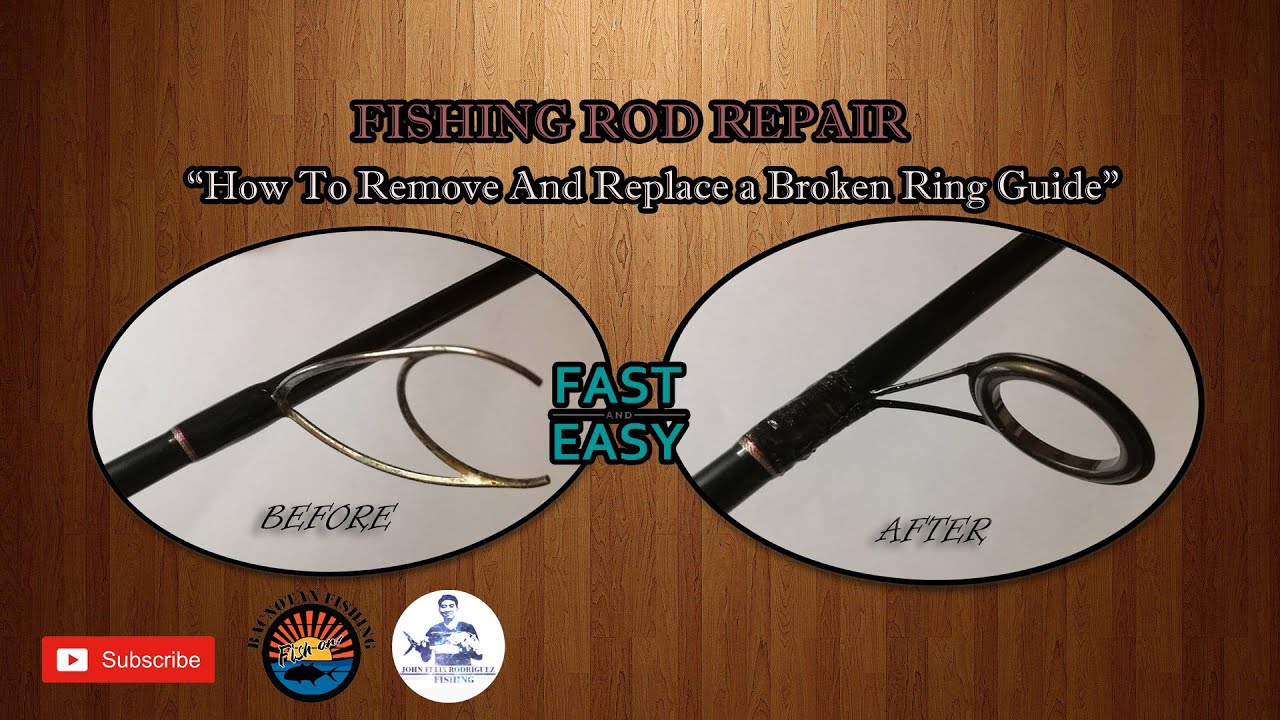
To repair or replace damaged fishing rod guide inserts, remove the old insert and secure a new one with adhesive. Ensure the replacement is of the correct size and material for your rod.
Fishing enthusiasts know that maintaining your gear is essential for a great experience on the water. A damaged guide insert can greatly affect your casting accuracy and the overall performance of your fishing rod. Addressing this issue promptly prevents line damage and preserves the longevity of your rod.
Tackling the problem of a damaged guide insert involves a straightforward process that every angler should be familiar with. With the right tools and materials, replacing a guide insert can be done quickly, ensuring you get back to fishing without unnecessary downtime. Keep your fishing trips successful by mastering the skill of maintaining your fishing rod, starting with efficient guide insert repair or replacement.

Credit: m.youtube.com
The Role Of Guide Inserts In Fishing Rod Performance
The Role of Guide Inserts in Fishing Rod Performance is critical for any angler’s success. These small but mighty components lie at the heart of a smooth, efficient fishing experience. Guide inserts protect fishing lines from wear and tear, ensuring longevity and performance.
Impact On Line Friction
Guide inserts play a crucial role in minimizing the friction between the fishing line and the rod itself. This friction can cause damage to both the line and the rod over time. With the correct guide inserts, your line glides effortlessly, reducing wear and providing a seamless fishing experience.
- Less friction means longer casting distances.
- A smoother line flow enhances sensitivity.
- Reduced friction improves line integrity and longevity.
Significance In Accurate Casting
For accurate casting, guide inserts are indispensable. They ensure that the line releases and retrieves in a consistent and controlled manner. This level of control is paramount for placing lures precisely where the fish are. Any damage to these inserts can lead to erratic casting and lost catches.
- Better insert condition equals more casting precision.
- Intact inserts contribute to a balanced rod action.
- Clean and aligned inserts facilitate targeted casting.

Credit: www.amazon.com
Common Causes Of Guide Insert Damage
Guide inserts on fishing rods play a vital role in protecting your line during a catch. But these small, yet crucial components can suffer from damage over time, which can compromise your fishing success and enjoyment. Understanding the common sources of wear helps in effective maintenance and repair. Let’s dive into the reasons why guide inserts might fail and require your attention.
Wear And Tear From Repeated Use
Guide inserts come into direct contact with fishing lines, often under great tension and friction. This constant interaction leads to gradual wear. Look for signs like:
- Thinning material which weakens the insert.
- Smoothness loss causing increased line abrasion.
- Grooves or cuts from lines impacting the insert surface.
Accidental Impacts And Mishandling
Not all damage stems from use on the water. Accidents happen, often when we least expect them. Causes include:
- Drops which can crack or dislodge the insert.
- Collisions with hard surfaces during transport.
- Bending or snapping from storing in tight spaces.
Identifying Damage To Your Guide Inserts
Every angler knows that a smooth and reliable fishing rod is crucial for a good fishing experience. Guide inserts play a key role in the casting and retrieval of your line. Damaged guide inserts can spell disaster for your fishing expedition. Keeping an eye out for wear and tear can save you from mishaps on the water. Here’s how to spot the problems before they ruin your day.
Visual Inspection Tips
Start with a close look at each guide insert. Look for any scratches, cracks, or chips. Even small imperfections can break your line. Bright light can help you see the finer details. Use a magnifying glass if you need to. If they look rough or uneven, it’s time to take action. Also, check for grooves worn by the fishing line over time. These are not always visible but can be felt with careful inspection.
Testing For Smooth Line Movement
To test the guide inserts, run a piece of nylon over them. If it catches or snags, the insert is likely damaged. You can also run a cotton swab through the guides. If fibers stick to the insert, there’s a problem. It is crucial to ensure each guide allows the line to pass through unimpeded. Faulty guides can cause the line to fray or snap at critical moments.
Follow these steps, and you can keep your fishing rod in top condition.
Tools And Materials Needed For Repair
For those passionate about fishing, maintaining a well-conditioned rod can be the difference between a good or bad day on the water. Repairing damaged fishing rod guide inserts requires a steady hand and the right tools and materials. Without the proper equipment, this essential task can seem daunting. Yet, with the right kit, any angler can make the necessary repairs to keep their rod in top-notch condition.
Essential Repair Kit Components
- New Guide Inserts – Match the size and material with your rod’s existing guides.
- Guide Adhesive – Ensures a secure fit for your new insert.
- Tweezers or Pliers – For precise insert placement.
- Sanding Paper – To smooth any rough edges before applying the new insert.
- Cotton Swabs – For clean adhesive application and removal of excess material.
- Razor Blade or Sharp Knife – To carefully remove old inserts or trim excess material.
- Rotary Tool – Optional for precision shaping or sanding.
- Magnifying Glass – Helps in inspecting and ensuring a perfect fit.
- Cloth – For cleaning the guide and prepared surfaces.
Selecting The Right Adhesive
Choosing a quality adhesive is key to securing a fishing rod guide insert. Opt for a specialty rod tip adhesive that can withstand the rigors of fishing conditions.
| Type of Adhesive | Properties | Best Use Case |
|---|---|---|
| Epoxy | Strong bond, waterproof, dries clear | Long-term repairs |
| Hot Melt Glue | Easy to apply, re-adjustable for a short time | Quick fixes |
| Super Glue | Fast-setting, transparent | Emergency repairs |
Remember to consider the temperature and humidity of your fishing environment when selecting your adhesive, as these factors can affect its performance.
Step-by-step Guide To Remove Damaged Inserts
Welcome to the Step-by-Step Guide to Remove Damaged Inserts from your beloved fishing rod. If you’ve noticed your line fraying or your casts aren’t as smooth as they used to be, it’s likely due to a damaged insert within your guide. Fear not, with patience and the right approach, you can remove and replace these inserts and return your fishing rod to its optimal performance. Let’s reel in the knowledge and get started!
Safely Removing The Old Insert
To ensure that you do not cause further damage to your fishing rod, follow these careful steps:
- Find a quiet, well-lit area to work in.
- Secure your rod so it doesn’t move around.
- Inspect the guide and locate the damaged insert.
- Use a pair of fine-tipped pliers or tweezers.
- Gently grip the edge of the insert.
- With a delicate twist and pull action, remove the insert.
- Keep steady pressure to avoid snapping the frame.
Be mindful throughout the process to avoid scratching the guide frame. If the insert is stubborn, apply heat carefully with a hairdryer set on low to loosen it.
Prepping The Guide Frame
Once the old insert is out, prepare the guide frame for the new insert:
- Inspect the frame for any burrs or residue.
- If found, gently smooth it out with fine sandpaper or a file.
- Clean the area with a soft cloth and some alcohol.
- Ensure the frame is dry and free of debris.
- Ready the replacement insert for installation.
Once you have completed these steps, your guide frame is now prepped and ready for a new insert. This lays the foundation for a seamless installation and ensures your fishing rod performs at its best.
Choosing The Right Replacement Guide Insert
Anglers know the importance of every component of their fishing rod. One vital part is the guide insert. It reduces friction, protects the line, and improves casting. If it’s broken, it’s crucial to find the perfect match. Let’s dive into how to choose the right replacement guide insert. The goal is to match not only the rod’s aesthetics but also its performance.
Matching Insert To Rod Action
Fishing rods come in different actions, which affects your insert choice. The rod’s bend—fast, medium, or slow—dictates the insert’s design. Choose a guide that complements your rod’s action for optimal casting and strength.
Material Considerations
Selecting the right material for your insert is crucial. Some top materials include:
- Ceramic: Offers a smooth surface for the line.
- Carbide: Known for its durability.
- Silicon carbide: Combines smoothness and strength.
Consider the type of fishing when choosing the material. Harsh conditions require tougher materials. Lighter fishing styles can use smoother, more sensitive inserts.
Installing The New Guide Insert
Ready to get your favorite fishing rod back in action? Installing the new guide insert is a critical step. This process demands a bit of precision and patience, but it’s something any angler can tackle. Let’s go through the installation steps for a fresh, new guide insert.
Securing The Insert
The first step is to prepare the guide framework. Make sure it is clean and free of any old glue or debris. Take the new insert and apply a small amount of rod tip adhesive to its base. Carefully place the insert into the guide frame. Double-check to ensure that it sits centered and level within the frame.
Curing Time And Tips
After setting the insert, it’s all about the wait. Different adhesives have varied curing times. It can take anywhere from a few minutes to several hours. Read the adhesive instructions for the exact time. Keep the rod still and in a secure place while the glue sets. This step is crucial for long-lasting repairs.
Here are some quick tips to ensure a successful guide insert replacement:
- Work in a well-lit area so you can see what you’re doing.
- Use the right adhesive meant for fishing rods.
- Do not rush the curing process; patience pays off.
- After curing, inspect the insert to confirm it’s secure.
Professional Repair Vs. Diy
Tackling the task of fixing a fishing rod guide insert might seem daunting. You have two avenues: professional repair services or a do-it-yourself (DIY) procedure. Both routes have merits, depending on your expertise, time, and the severity of the damage. Choosing the right option can save you time, money, and get you back to fishing sooner. Remember, selecting between professional repair and DIY comes down to your comfort level and the condition of your fishing rod.
!– When To Seek Professional Help —
Before you decide to fix the rod guide insert, assess the damage. Significant issues require a professional touch. Small cracks might seem minor, but could point to greater stress on the rod. An expert has the right tools and materials.
- Damaged beyond simple replacement
- Unfamiliar with repair processes
- Limited access to the right tools
!– Benefits Of Learning To Diy —
Learning to replace the guide inserts yourself is rewarding. DIY repairs offer flexibility and a sense of ownership over your equipment. With practice, what was once intimidating becomes manageable. Plus, DIY skills equip you with knowledge for future on-the-spot repairs.
- Save on repair costs
- Immediate solutions on fishing trips
- Customize your gear to your preferences
Maintaining Your Fishing Rod Guides
Fishing rod guides are crucial for a smooth fishing experience. Protection and care of your rod guides can prevent potential damage and the need for replacements. Let’s dive into how to keep your guides in top condition.
Routine Cleaning And Inspection
Regular maintenance ensures the longevity of fishing rod guides. Do not overlook these steps:
- Wipe down your guides with a soft cloth after each use.
- Remove debris using a small brush or cotton swab.
- Inspect for nicks or cracks by running a cotton ball through the guide. If it snags, there may be damage.
- Check the inserts. Loose or damaged inserts need attention.
Long-term Storage Best Practices
When storing your fishing rod for extended periods, follow these guidelines:
- Clean the guides thoroughly before storage.
- Loosen the line tension to avoid putting stress on the rod and guides.
- Store in a cool, dry place away from direct sunlight.
- Use a rod sleeve or a case for extra protection.
Credit: m.youtube.com
Troubleshooting Common Issues Post-repair
After repairing or replacing fishing rod guide inserts, anglers may face fresh challenges. Addressing post-repair issues is crucial for a seamless fishing experience. Let’s troubleshoot common problems to ensure your rod performs at its best.
Dealing With Loose Inserts
Loose guide inserts can undo your repair efforts. They may fall out and cause line damage. Follow these steps to secure them:
- Inspect all inserts for movement.
- Use a tiny drop of super glue.
- Press firmly and let it dry.
Ensuring Smooth Casting After Repair
Smooth casting relies on a well-repaired guide. To achieve this:
- Check for alignment of guides.
- Ensure the finish is even and smooth.
- Test cast to detect snags or friction.
| Check Point | Action | Expected Result |
|---|---|---|
| Insert Security | Glue and press | Inserts stay in place |
| Guide Alignment | Inspect visually | Straight line with no bends |
| Casting Quality | Perform test casts | Smooth, effortless cast |
Regular maintenance keeps your fishing rod in top condition. A post-repair check is part of that. Ensure these tasks are complete for optimal performance.
Resources For Enthusiasts And Anglers
Embarking on the repair or replacement of fishing rod guide inserts doesn’t just restore functionality to your beloved gear; it extends the rod’s life and your fishing adventures. Anglers and fishing buffs can discover a sea of resources to master this task. It’s all about knowing where to drop the line. Let’s navigate together through these treasure troves of knowledge!
Online Tutorials And Forums
The digital world teems with step-by-step tutorials, each one a potential catch of the day for avid repairers. Open the gateway to learning with a simple search:
- Video platforms showcase guides repairing their rods in detail.
- Expert blogs often share high-resolution photos and repair tips.
- Fishing forums provide threaded discussions, perfect for seeking advice or sharing experiences.
Remember to check the comments or Q&A sections for hidden gems of information. They might just hold the secret to your specific repair situation.
Workshops And Local Fishing Clubs
Contact your local fishing store or club to reel in information about upcoming workshops. These in-person sessions can offer:
| Benefits | Description |
|---|---|
| Hands-on experience | You learn by doing and get immediate feedback. |
| Networking | Connect with fellow enthusiasts for future support. |
| Tools and Materials | Discover the best tools and where to find them. |
Local fishing clubs often have seasoned members who love helping others – possibly in exchange for a story or two about your biggest catch!
Frequently Asked Questions On How Do You Repair Or Replace Damaged Fishing Rod Guide Inserts?
Can Fishing Rod Guide Inserts Be Easily Replaced?
Yes, damaged fishing rod guide inserts can be replaced. It’s a simple process that involves carefully removing the old insert and securing a new one in place. It requires minimal tools and basic DIY skills.
What Tools Are Needed For Repairing Fishing Rod Guides?
To repair fishing rod guides, you’ll need a few basic tools: needle-nose pliers, fine-grit sandpaper, rod epoxy, and a razor blade or sharp knife. These tools help remove, prepare, and reinstall the guide insert.
How Long Does It Take To Fix A Rod Guide Insert?
Fixing a rod guide insert can be quick, typically taking about 20-30 minutes. This duration includes removing the damaged insert, setting the new one, and allowing the adhesive to cure properly.
Are Replacement Fishing Rod Guide Inserts Expensive?
Replacement fishing rod guide inserts are not expensive. They are widely available at low costs, making them an economical option for maintaining your fishing rod’s performance.
Conclusion
Repairing or replacing damaged guides is crucial for a smooth fishing experience. Embark on this simple maintenance, and your rod will thank you with reliable performance. Keep fishing adventures successful and enjoy the enhanced longevity of your gear. Remember, a well-maintained rod brings countless tranquil moments by the water.
Happy fishing!
