
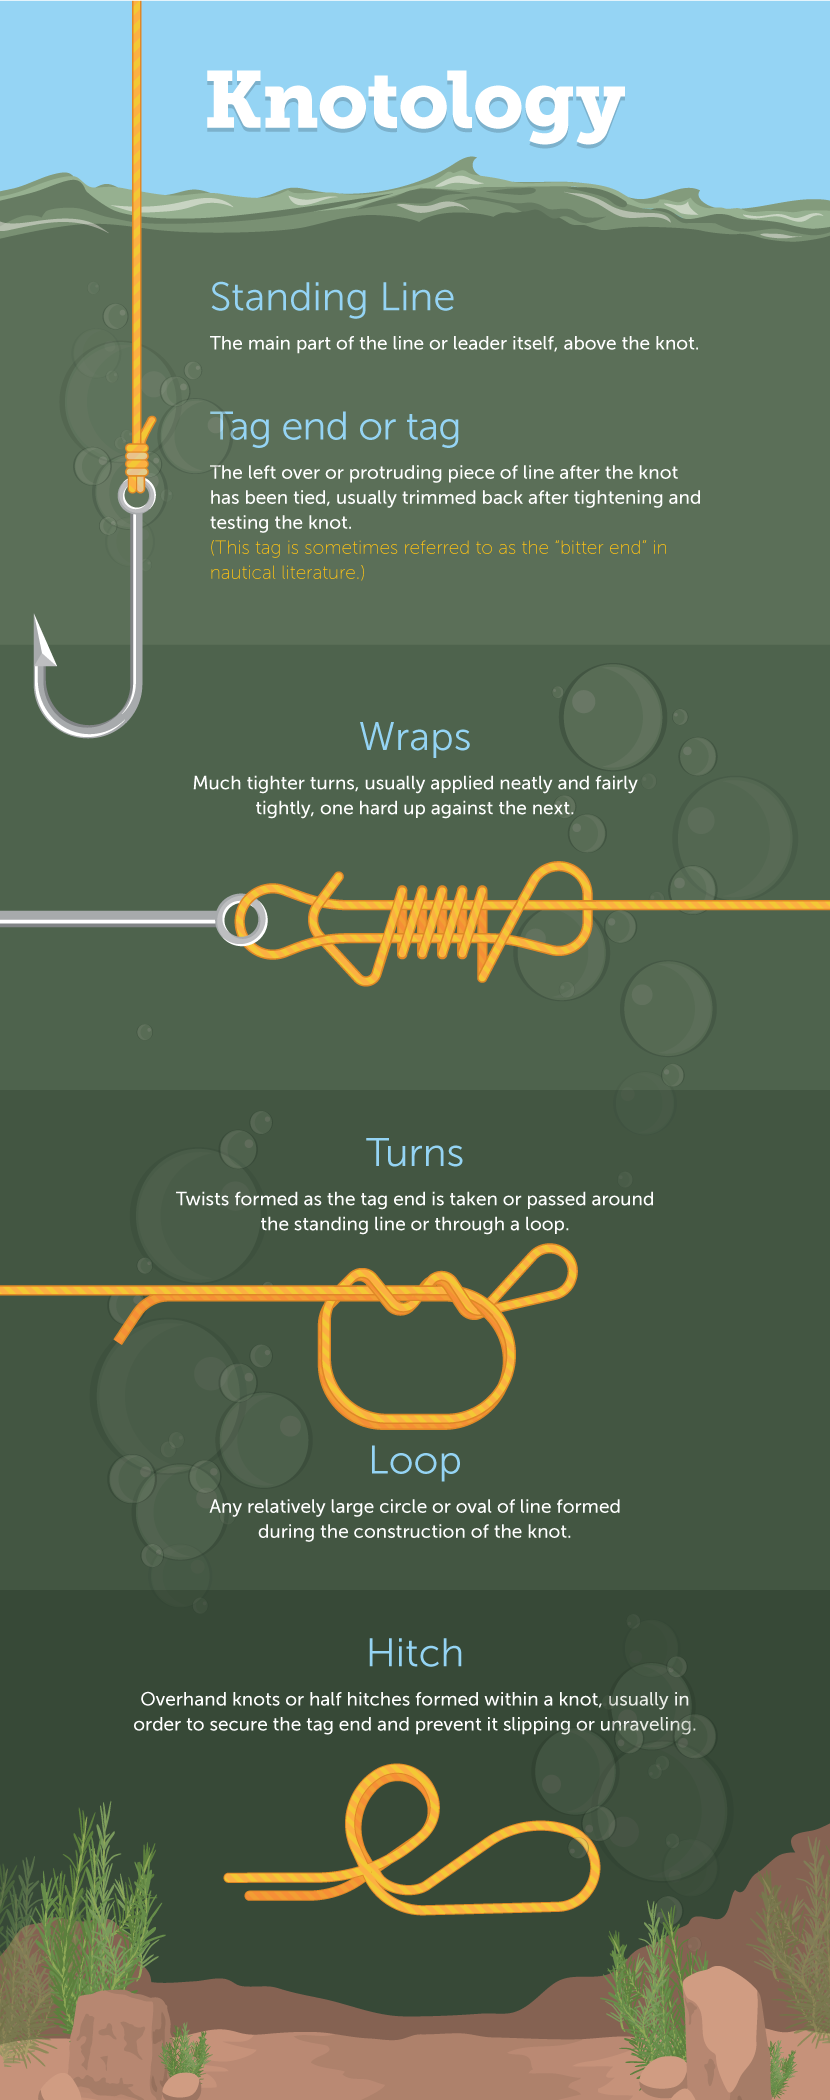
To finish wrapping fishing rod guides neatly, secure the thread with a half-hitch knot and apply epoxy. Trim excess thread after the epoxy cures for a clean appearance.
Wrapping the guides on a fishing rod is a critical step that requires precision and patience. A neatly wrapped rod not only improves the rod’s performance but also enhances its aesthetic appeal. The process involves tightly winding thread around the rod and guide feet, ensuring the guides align correctly with the rod’s spine.
After winding, it’s essential to lock the thread in place with a secure knot and remove any surplus to maintain a tidy look. Applying epoxy not only seals the thread wraps but also protects them from the elements and the wear and tear of regular use. A well-finished wrap will keep your guides in place and your line flowing smoothly, improving your overall fishing experience.
Introduction To Fishing Rod Building
Building a fishing rod brings excitement and a sense of accomplishment. Every angler values the precise placement and neat finishing of guide wraps. It’s not just about looks, but also performance. Let’s dive into how to wrap rod guides neatly.
Importance Of Neat Guide Wrapping
Neat guide wrapping is essential for both aesthetic appeal and rod performance. Tightly wrapped guides mean less friction during a catch. This precision helps maintain a strong fishing line.
Materials Required For Wrapping
To start wrapping rod guides, you’ll need a few key materials:
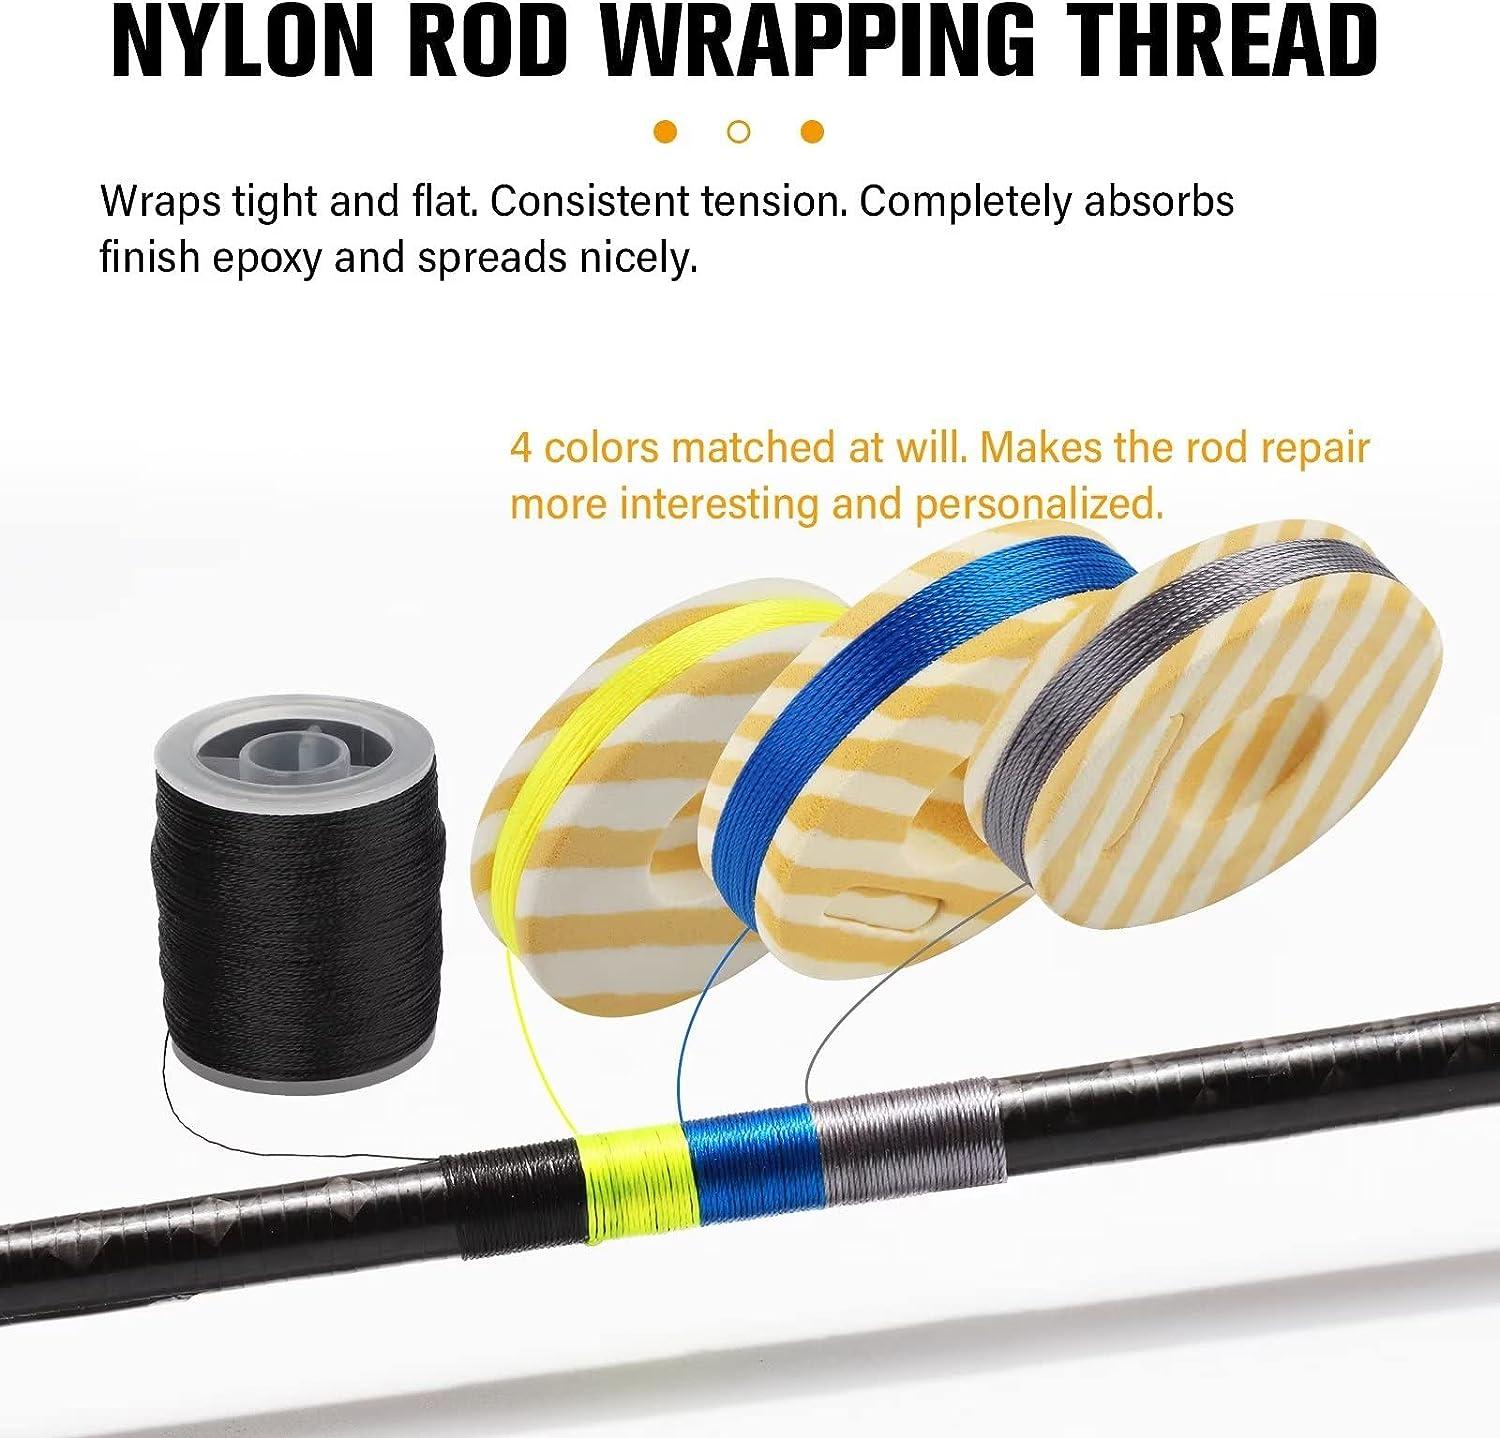
- Wrapping thread: The color and size matter for visual quality and binding strength.
- Flex coat: This secures the thread in place.
- Rod rotation device: It helps in even application.
- Small scissors: They trim thread with precision.
- Lighter or heat gun: This is used to finish the wrap smoothly.
Preparing The Rod For Wrapping
Welcome to the world of customizing your fishing experience! When it comes to fishing, the devil is in the details. Neatly wrapped fishing rod guides not only add a touch of personal flair but also ensure the longevity and performance of your rod. Let’s dive into the initial steps you need to take before you start wrapping those guides.
Cleaning The Rod Surface
Before applying any thread to the rod, it’s crucial to have a clean surface. A clean rod allows for secure guide placement and an overall smoother wrap. Begin by grabbing a soft cloth and some isopropyl alcohol. Gently wipe down the rod to remove any dust, dirt, or oils. Be sure to focus on the areas around where the guides will sit. A thorough clean-up sets the foundation for the rest of the process.
Aligning The Guides
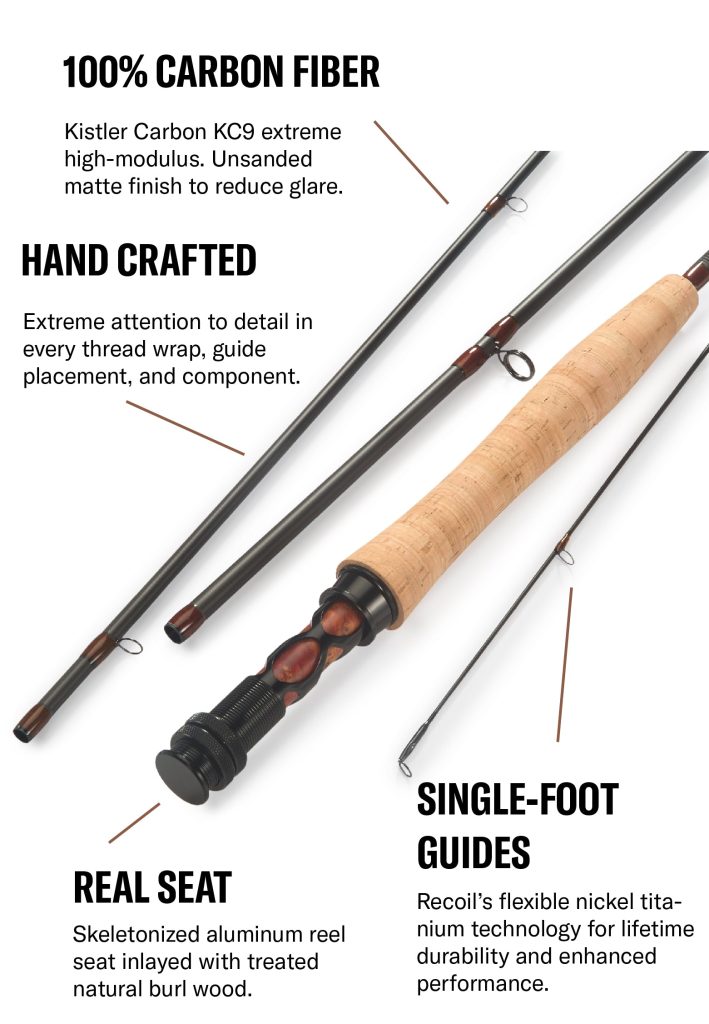
Having your guides in perfect alignment is key to a professional, functioning finish. Start by marking the guide positions with a fine-tip marker or small pieces of masking tape. Next, loosely place the guides along these marks. Always double-check alignment by looking down the length of the rod. The guides should form a straight path when everything is in place. Ensuring precise guide alignment before wrapping will save you time and frustration later on. Once you’re happy with their positions, secure them with small bands or more masking tape.
Selecting The Right Thread
Preparing a fishing rod with a sleek, finished look starts with the thread. The correct thread type and color pattern make all the difference. Neat wrapping secures the guides and brings out the rod’s personality.
Types Of Wrapping Thread
Selecting the ideal thread is crucial for a professional and durable finish. Let’s explore the options:
- Nylon: Flexible and easy to use, great for beginners.
- Silk: Offers a classic, sleek look, yet delicate.
- Polyester: Strong and fade-resistant, ideal for heavy-duty fishing.
- Metallic: Adds sparkle, perfect for custom designs.
Color And Pattern Considerations
Choosing the right color and pattern elevates the rod’s aesthetic. Consider these factors for the best visual impact:
| Color | Tips |
|---|---|
| Solid Colors | Creates a clean, uniform look. |
| Transparent | Shows the rod blank’s natural finish. |
| Contrasting Colors | A highlight for signature style. |
| Complementary Colors | Ensures a pleasing blend with the rod. |
Patterns add personality. Stripes, fades, or checks are popular. Align the pattern with the rod’s use for added character.
Credit: www.gosupps.com
Setting Up The Wrapping Station
Anglers know that perfecting the art of rod wrapping takes precision. A well-set wrapping station is key to success. Let’s set up your station to ensure your fishing rod guides are wrapped neatly.
Securing The Rod
Before wrapping begins, secure your fishing rod. A stable rod is a canvas for clean guide wraps. Use a rod vise or holder for a firm grip. Make sure the rod doesn’t move. Adjust the stand to keep the rod horizontal.
Thread Tension Tips
Consistent tension on the wrapping thread is vital. Even tension results in smooth, tight wraps. Use a tensioning device or bobbin. This keeps the thread tight but not too tight. The thread will not break yet remains evenly distributed. Here’s how to maintain tension:
- Check tension often, adjusting as needed.
- Use a spool tensioner to stabilize thread flow.
- Guide the thread gently with your fingers for control.
With these steps, your wrapping station will be the cornerstone of neat, professional guide wraps for your fishing rod.
Wrapping Technique Essentials
Perfecting the art of wrapping fishing rod guides starts with mastering the technique. A neat wrap ensures not only the longevity of the rod but also a smoother fishing experience. Let’s dive into the essentials so your wraps are both functional and visually appealing.
Starting The Wrap
Initiate with precision for a clean look. Secure your thread to the rod by overlapping wraps.
- Position the guide on the rod where it will sit.
- Hold the thread at a 45-degree angle to start.
- Wrap over the tag end to lock the thread in place.
- Continue with neat, touching turns.
Maintaining Tension And Alignment
Consistency is key to tidy wraps. Keep tension and guide alignment throughout the process.
- Use a tensioning tool or your fingers to maintain thread tension.
- Guide the thread carefully to avoid overlaps or gaps.
- Inspect alignment regularly, adjusting the guide as required.
- Finish with a half hitch or a pull-through loop to secure.
Advanced Wrapping Techniques
Mastering Advanced Wrapping Techniques takes your fishing rod to the next level. Enhance performance and visual appeal with neat guide wraps. These methods require patience and practice. Here, let’s perfect the art of finishing guide wraps.
Decorative Wraps
Decorative wraps blend functionality with style. They protect and personalize your rod. Follow these steps for flawless decorative wraps:
- Clean the rod surface before starting.
- Use a color preserver for vibrant thread colors.
- Apply the under-wrap layer smoothly.
- Overlay with your chosen decorative pattern.
- Wrap tightly to prevent gaps or slips.
- Finish with an epoxy coating for durability.
A neatly done decorative wrap stands out on the water and shows off your craftsmanship.
Adding Trim Bands
Add a professional touch with trim bands. These are narrow loops of thread that accentuate your main wraps. They also reinforce the wrap ends. To add trim bands cleanly:
- Complete your main wrap.
- Select a contrasting thread color for visibility.
- Start a small loop using the trim color.
- Wrap the trim band tightly against the main wrap.
- Secure the end under the main wrap threads.
- Apply epoxy to fix the trim band in place.
The resulting look is sleek and adds a custom feel to your fishing rod.
Finishing The Wrap
Wrapping guides on a fishing rod is an art that requires patience and precision. After carefully wrapping your threads, the final steps will ensure a sleek and durable finish. These steps can make or break the professional appearance of your fishing rod.
Securing The Thread Ends
Once you have finished wrapping the thread around the rod guide, it’s time to secure the ends. Use a small loop of thread placed under the last few wraps. Cut the working thread, leaving a small tail. Pull the tail through the looped thread, tightening it beneath the wraps. This technique locks the thread in place and ensures your wrap stays tight and secure. Trim any excess thread close to the wrap.
Applying Epoxy Or Finish
To give your wraps a smooth, clear coat and shield them from water and wear, epoxy or specialized rod finish is essential.
- Mix the finish components properly.
- Apply a thin, even layer with a brush or spatula.
- Rotate the rod slowly to prevent drips and sags.
Ensure the finish covers all the thread and overlaps slightly onto the rod blank. Allow the finish to cure based on the manufacturer’s instructions. A well-applied finish not only secures your wrapping but also enhances its longevity.
Credit: www.northlandtackle.com
Curing And Inspection
After wrapping your fishing rod guides with precision, the final steps are curing and inspection. These ensure your guides are set to last. Proper curing conditions are key for a strong finish. A thorough final check identifies any flaws that might compromise your rod’s performance. Ready to secure your wraps for countless fishing trips? Let’s dive in.
Proper Curing Conditions
Curing is all about setting the thread wraps. It’s like baking a cake. You want perfect conditions so your hard work pays off. Remember these points for ideal curing:
- Temperature matters—aim for 65-75°F (18-24°C).
- Low humidity is best—dry air helps the finish set better.
- Avoid direct sunlight—the UV rays can mess up the cure.
- Gentle air circulation—helps the finish cure evenly without bubbles.
- Patience wins—give it 24 hours, at least, for a solid set.
Final Check For Flaws
With curing complete, it’s time to inspect. Look at your fishing rod like a treasure. Any small flaw could be a big issue later on. Do this check to spot problems:
- Examine under bright light—it makes everything clearer.
- Rotate the rod slowly—view it from all angles.
- Search for bubbles or bumps—they can weaken the grip.
- Check for loose ends or frays—tighten them up now.
- Smoothness is key—any roughness needs a fix.
Maintenance Of Wrapped Guides
Maintaining wrapped guides on a fishing rod ensures both longevity and optimal performance during those intensive fishing sessions. Proper care can prevent damage and keep your fishing adventures hassle-free. Below, explore how routine cleaning and periodic inspections maintain the pristine condition of your rod guides.
Routine Cleaning
- Wipe down after use: Use a soft, damp cloth to remove salt, dirt, and debris.
- Dry properly: Ensure all components are completely dry before storage.
- Use gentle cleaners: Mild soap with water works best to avoid damaging the wraps.
- Protect with rod sleeves: Store rods in protective covers to reduce the risk of scratches.
Periodic Inspection And Repairs
| Check Points | Action Required |
|---|---|
| Loose threads: | Secure with a thin epoxy coating. |
| Cracked wraps: | Remove old wraps, re-wrap, and coat. |
| Guide alignment: | Adjust as needed to maintain straightness. |
| Corrosion: | Replace corroded guides promptly. |

Credit: www.amazon.com
Troubleshooting Common Wrapping Issues
When it comes to finishing the wrapping of fishing rod guides, even the smallest imperfections can mar a good day’s fishing. A smooth, clean wrap ensures your fishing rod looks great and performs even better. Let’s dive into some common wrapping problems and how to solve them for a perfect finish every time.
Avoiding Bubbles In The Finish
Bubbles can ruin a seamless finish on rod guides. Keep these tips in mind to avoid this pesky issue:
- Mix epoxy slowly to reduce air entrapment.
- Apply thin coats rather than one thick coat.
- Use a heat gun or alcohol burner to gently warm the finish, helping bubbles rise and pop.
Dealing With Thread Fraying
Frayed threads can lead to an uneven wrap that’s not only unsightly but can affect the rod’s integrity. Combat fraying by following these steps:
- Ensure the guide feet are smoothly filed down to prevent snagging.
- Use sharp, high-quality scissors for clean cuts.
- Secure the thread with a small drop of superglue before trimming to lock the ends.
Frequently Asked Questions Of How Do You Finish The Wrapping Of Fishing Rod Guides Neatly?
What Materials Are Needed For Rod Guide Wrapping?
To wrap fishing rod guides neatly, you need thread, epoxy, a razor blade, and a wrapping tool. Thread secures the guide, while epoxy ensures durability. The blade ensures clean cuts.
Can I Wrap Fishing Rod Guides At Home?
Absolutely! With the right materials and some patience, you can wrap rod guides at home. It’s a skillful task but definitely achievable with practice.
What Are The Steps To Wrapping Rod Guides?
First, secure the rod in a vise. Attach the guide with a thread loop. Wrap tightly towards the rod tip, cut thread neatly, then apply epoxy. Let it cure without disturbance.
How Long Does It Take To Wrap A Rod Guide?
Wrapping a single rod guide can take between 5 to 15 minutes. Total time varies based on experience and the number of guides. Allowing epoxy to cure adds to the duration.
Conclusion
Wrapping up your fishing rod guides neatly is paramount for a smooth casting experience. Mastery of this skill ensures your gear’s longevity and performance. Remember, consistent tension and precision are your allies. Embrace patience, and the result will be both functional and aesthetic.
Tight lines and happy fishing!
